Updated on October 04, 2022
3D printing has always been a slow process. Even with the newest fast-curing monochrome resin 3D printers, printing just a small model can take hours. Unsurprisingly, everyone gets to the point when they start thinking about ways to speed up this process. This article will discuss different options for achieving faster resin 3D printing.
We’ll be talking about a few tweaks you can make to your settings to achieve faster resin 3D printing speeds without sacrificing the quality of your prints. Some of these changes will require tinkering and trial and error to figure out the right settings. But if you’re patient and persistent, you will be able to shave off a few minutes or even hours off your printing sessions.
Why are the recommended settings so slow?
3D printing settings may depend on many different factors. We have covered that extensively in this article: The Complete Resin 3D Printing Settings Guide for Beginners. The same resin printer, same model, same resin, and same slicer settings may produce different results for different users. That is because there are yet more factors at play. Resin curing speed depends on room temperature, adhesion to the build plate depends on the leveling and smoothness of the build plate, needed lift height depends on the tightness of the FEP, etc.
We at AmeraLabs always recommend conservative settings for new users: slightly higher exposure, slow lift speeds, and a higher lift height. This means that no matter what model you decide to print, what environment you’re printing in, and the condition of your printer, you will most likely succeed with your first print.
Once you get a good print, you can work on finding “better” settings than what we recommended.
How should I make changes in settings for faster 3D printing?
Before you begin making changes, you should be aware of these four rules:
First rule – make sure you can get good prints first. Don’t try changing settings to improve printing speed until you are confident that your current “slow” settings can produce high-quality prints consistently.
Second rule – don’t change everything at once. Only change one setting at a time. Print something after each change to make sure that you can still get good prints. Otherwise, if your print fails, you won’t be able to tell which change messed it up.
Third rule – don’t be disappointed by failures. Learn from them, note what works and what doesn’t, and move on. If you want to test the limits of your printer, you will get some failures. That’s a fact.
Fourth rule – use your common sense. 3D printing is a complicated process, and so many factors are at play. There’s no “silver bullet.” Expect that there will be some tinkering with your printer settings. Logical thinking is the most crucial for determining how changes in settings will affect your print.
Let’s get to it.
Setting No. 1: Lower your lift height
Lift height is the distance the build plate moves up between layers to separate the printed model from the FEP. Thus, the perfect lift height is just high enough to peel the model off the FEP. That sounds easier than it is. Remember, FEP will flex when the build plate starts rising. So lift height depends on the quality, size, and thickness of your 3D printer’s FEP. The model you’re printing, the positioning of that model on the build plate, and even the amount of resin in the VAT will impact how much FEP will flex.
Loose and worn out FEP will stretch more, and you’ll have to use a higher lift height. Similarly, very thin FEP film stretches more than thicker films. Moreover, the model will stick more to a FEP that is worn-out, hazy, or has scratches, so you might need to lift higher to overcome that adhesion force.
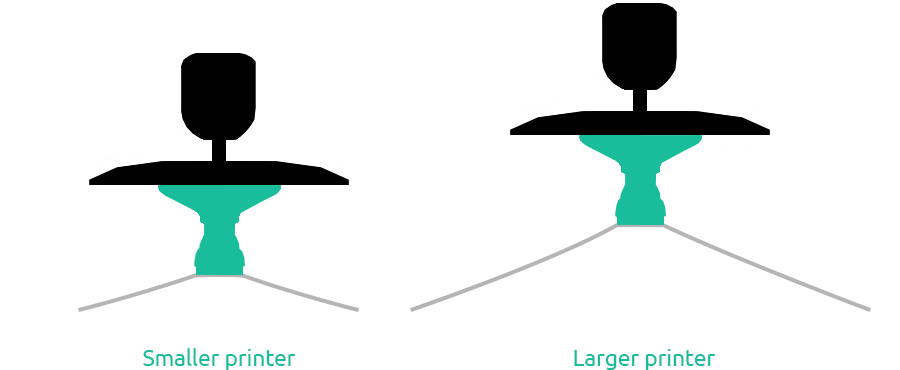
On top of that, bigger printers use larger FEP sheets. The larger the FEP, the more it will stretch, and the higher you will have to lift your models to peel them off.
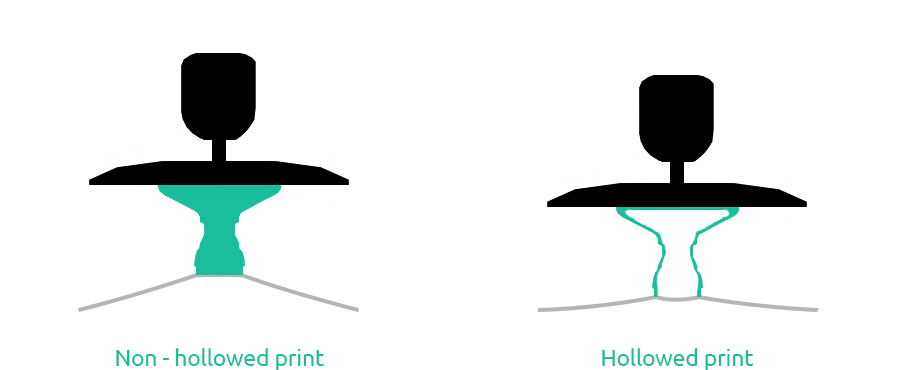
Finally, large non-hollowed objects might stick to the FEP more, and you might need to lift higher to peel them off. Thus you might get away with lower lift heights when printing small miniatures and hollowed models.
When the lift height is not high enough, your models will fail. Therefore, we always recommend using a higher lift height. That way, you’ll always succeed, even if you have thin or worn-out FEP and print large models.
When you know why proper lift height is important, you can try to minimize it. A lower lift distance will increase your printing speed. However, it is not easy to determine the right height. To find it, you should run a few prints with a larger layer area that are positioned in the middle of the build plate. Try lowering your lift height and see if any issues arise. If the print fails to separate from the FEP, you should see part of the model stuck to the build plate and a layer of cured film on the FEP. There might also be some gaps in between layers on your model if your lift height is not high enough. Experiment until you find the smallest lift height that is producing good results.
We recommend using a 7 mm lift height for normal layers on smaller 3D printers. But you can get away with 4-6 mm in most cases. You should stick with lift heights of 7 mm or above for bigger printers.
Setting No. 2: Make your lift speed faster
Lift speed is another thing to consider. Once you get everything else right, you can try 3D printing with faster lift speeds.
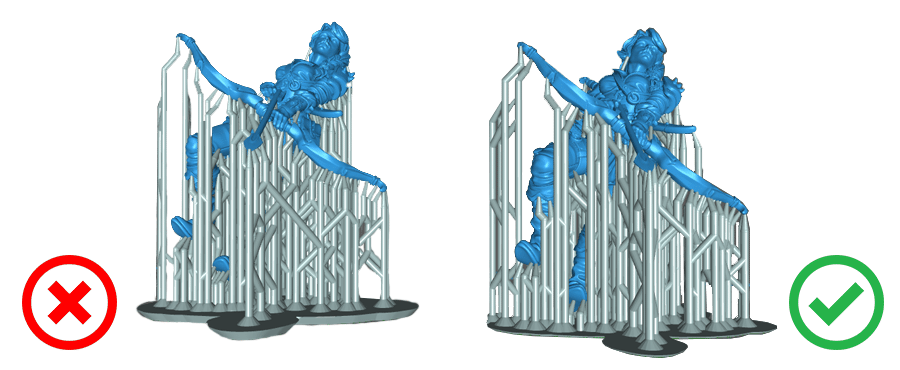
We usually recommend 5 mm/min lift speeds for bottom layers and 40-60mm/min for normal layers. Those are pretty conservative settings that will give you good consistent results. But we also know experts who print with 300 mm/min lift speeds. To do this successfully, they control other variables well. They have a stable temperature of 25° C or above. They use thicker, well placed supports. Their models are hollowed and oriented well. They use longer bottom layer exposure to increase first level adhesion to the build plate. They use good quality FEP. Their build plates are leveled. They might use a slightly higher normal layer exposure. The list goes on. And with everything in balance, they can print with such high lift speeds.
There was some hype a while ago about faster lift speeds. Higher than 180 mm/min was called “vroom” 3D printing. Some users reported that such a high lift speed gave them even better results than a slower one. However, we have never seen proper evidence or research on that. In our experience, printing with a faster lift speed is riskier. But it would shorten your print time significantly. So once you have all the other factors right, try experimenting by increasing your lift speed.
Setting No. 3: Shorten light off delay / rest-time after retract
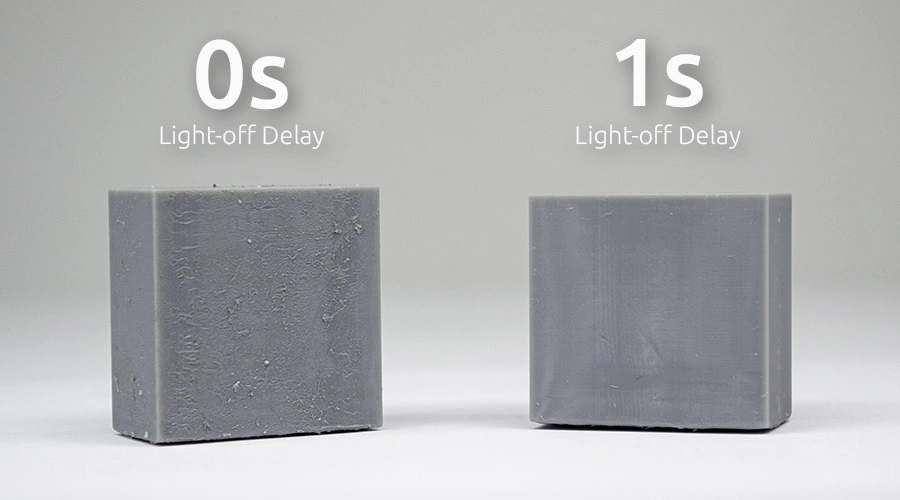
Light-off delay / rest-time after retract can be lowered too to make resin 3D printing faster. We recommend rest time after retract set at 1 s because it is important when printing thicker, non-hollowed, or hollowed models with thick walls. But for small minis or hollowed models with thinner walls and properly placed vent holes, you can lower it to 0.5 s. You can even lower it to less than 0.5 s for very thin, less viscous resins. More on this here: Better surfaces with Light-off delay. Blooming phenomenon.
Setting No. 4: Reduce number of bottom layers
The number of bottom layers can be lowered to 3-6 depending on how level your build plate is.
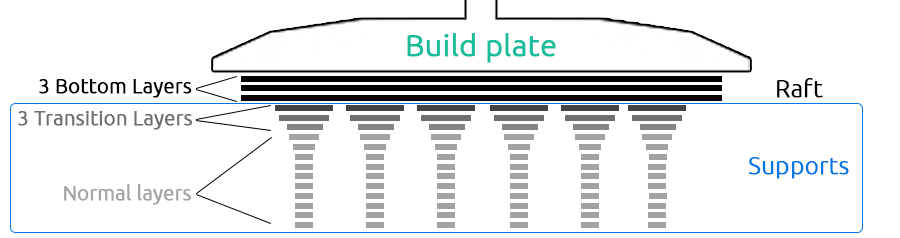
If you are still printing with the default 1 mm thick raft, you can easily lower it to be only 0.1-0.2 mm thick. It will 3D print much faster. You will be able to use a lower number of bottom layers for a thinner raft. For example, if you print with 50 micron layers, use a 150 micron thick raft and cure those 3 bottom layers with a longer exposure. More on this here: Why should you not use default 3D printing raft settings?
Setting No. 5: Use transition layers wisely
If you are not printing flat on the build plate and your model is lifted on supports, you don’t need many transition layers. Just make sure that your raft is thin and the number of bottom (initial) layers is equal to or higher than the thickness of your raft. This will cure the whole raft with a longer exposure. After the whole raft is cured, you can add 2-3 transition layers to ensure that your support base is strong.
Setting No. 6: Use a shorter bottom layer exposure
Bottom layer exposure can be lowered too for faster resin 3D printing. We recommend making it around 8-12 times longer than your normal layer exposure time. But each printer is a bit different. If it’s hard to remove prints off the build plate, then you can lower the bottom layer exposure. With some of the newest 3D printers, we use bottom layer exposure that is only 4-5 times longer than normal layer exposure. Again, you should go with a longer bottom layer exposure for big, heavy, non-hollowed pieces. For tiny minis, you may get away with a much shorter bottom layer exposure.
Setting No. 7: Use a shorter normal layer exposure
Normal layer exposure is another setting to consider. New users sometimes make a mistake by printing something on one exposure setting, getting a good result, and assuming that they’ve found the perfect exposure time. However, resins can give good results in a range of exposure settings. For example, a model printed with 1.2 s normal layer exposure might look just as good as with 2.2 s exposure.

Printing our AmeraLabs town calibration model with several different exposure settings is a good idea. For example, if we recommend 2.4 seconds as a good starting point, run a few towns at 2.0, 2.3, and 2.5 seconds. Then evaluate the results and see if you would be happy with a shorter exposure. Shorter exposure will give you faster printing.
Setting No. 8: Use a faster retract speed
Retract speed rarely has any impact on the quality of your prints. It could have some importance if you print very delicate items with many thin features. Those can bend a little during fast retraction.
High retract speed could also cause issues when you print with viscous resins. It could create turbulences in resin, resulting in a blooming effect on your prints. This is where rest time after retract becomes super important.
Otherwise, feel free to experiment with faster retract speeds. We managed to get decent prints even with a 300 mm/min retract speed.
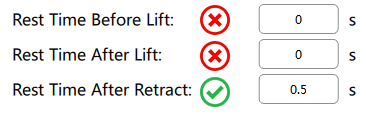
Setting No. 9: Don’t use Rest Time Before Lift and Rest Time After Lift
Rest time before lift makes the printer pause before lifting the build plate after exposure of each layer is finished, while rest time after lift adds another pause at the top of the build plate movement. Both of these pauses don’t do anything important. You can set them to 0 s. The only pause you should definitely use is the rest time after retract.
Bonus advice: failure is the biggest time waste!
With all of the above being said, a failed 3D print costs both time and money. Pushing the limits of your 3D printer is great. Everyone should learn what their machines are capable of. But, in the end, one big failed print can cost more time to reprint than whatever you have saved over a period of earlier prints. So conservative settings are usually a better choice for important and big projects. Despite that, we encourage you to experiment, explore, learn, enjoy the process, and keep your head up when things go south!
Other articles from AmeraLabs
- The Complete Resin 3D Printing Settings Guide for Beginners
- 10 reasons why you get unexpected horizontal lines on your 3D prints
- Why is it so important to shake the resin bottle?
- 9 common mistakes when switching from FDM to SLA 3D printing
- 6 Key Principles of 3D Printing Supports that Work
- Why should you not use default 3D printing raft settings?