
Updated on July 10, 2023
One of the most challenging aspects of resin 3D printing for new users is understanding the concept of supports. Where should one start? Which support settings are the most important? Does auto-supports work? This article just scratches the surface of this complicated topic and shows one example of finding the right support settings by trusting the automated supports of the VoxelDance Tango slicer.
Luckily, auto-supports on all slicers are getting better and better every day. However, there are still some parameters the user must understand to get the best from their 3D printers. We’ve teamed up with VoxelDance to explore automated supports on their slicer.
VoxelDance is a premium slicing software with powerful auto-support capabilities.
For this article, the VoxelDance Tango Slicer team took our AmeraLabs TGM-7 resin and ran a few tests with Tango smart support scripts to find perfect support settings on Elegoo Saturn 2 3D printer. The settings involved were:
- anchor distance,
- support top width,
- reinforce lowest points (strengthened lowest point support) distance, and height.
Take note that the settings might be different for other resins, 3D printers, and slicers.
Key parameters of VoxelDance Tango slicer
Anchor distance
The first parameter that we investigated was Anchor distance. It shows the distance between support tips.

The smaller the distance between the anchor points, the denser the tips will be. The denser you place your support tips, the better it will hold the printed model. Also, dense tips help to minimize model sagging between supports.

Therefore, a smaller anchor distance will increase the success rate of printing. However, supports that are too dense will be harder to remove.
Based on our experience, we have selected 1 mm, 1.5 mm, and 2 mm anchor distances for our tests.
Support top width
The support top width refers to the diameter of the support tip. In short, thicker support tips will cure to the model better and will ensure that the model stays connected to the supports. So, thicker support tips will increase the success rate of your printing. However, supports with thicker tips will be harder to remove after printing and might leave bigger marks on the surface of your models.
On the other hand, if the diameter of your support tips is too small, the model will detach from the supports during printing and you’ll get a failed print.
We have tested 0.15 mm, 0.25 mm, and 0.35 mm support tips for our tests.

Reinforce lowest points
Reinforce lowest points is a distinct feature of the Tango slicer. It tells the system to automatically add additional supports on the lower part of the model to ensure that the model stays connected to the supports.
The reinforce height defines what distance from the bottom of the model should have a higher support density.
We tested the influence of reinforced supports in the following tests.

3D printing parameters
For AmeraLabs TGM-7 resin on Elegoo Saturn 2 3D printer we used the following printing parameters.
Take note that the support success rate is highly related to the printing parameters used. We cover all of the settings extensively in this article: The Complete Resin 3D Printing Settings Guide for Beginners
The settings used are slightly over-curing the model, resulting in stronger supports. This allows to use thinner support tips at the expense of a small loss of negative features (holes and gaps). If you are aiming to achieve better details on the model, you can increase support density and print with a shorter exposure time.

Support settings for hemisphere model
We first started with a hemisphere model with a radius of 1 cm. We looked at the influence of anchor distance.
These first prints were all printed with 0.15 mm support top width and different anchor distances.

As you can see, the print with a 1mm anchor distance was the only successful one. However, it also has some surface deformations in the center.
The following prints were all printed with 0.25 mm support top width and different anchor distances.

This time, thicker support tips compensated for the higher anchor distance, and all prints stayed connected to the supports. However, the models with 1.5 and 2 mm anchor distances had deformed surfaces between supports. The third group of prints was all printed with 0.35 mm support top width and different anchor distances.

Again the only model that printed successfully and without surface deformations was the one with a 1 mm anchor distance. However, with a 0.35 m support top width, it was much harder to remove supports.
All in all, the 1mm anchor distance has dense support tips, which can ensure successful printing with no deformation. The lower support density with 1.5 mm and 2 mm anchor distances resulted in surface deformations between supports due to model sagging.
Hemisphere model with reinforced lowest points
Next, let’s take a look at the influence of the anchor distance on the hemispherical print after turning on the reinforce lowest points in the Tango Slicer.
The previous tests showed that the 1 mm anchor distance was the best parameter to ensure successful printing with no surface deformation. Therefore, we will turn on the reinforce lowest points and set the lowest anchor distance to 1 mm and the reinforce height to 2 mm.

This makes the bottom portion of the model to be supported with 1 mm distances between supports, and then the rest of the model will be supported with 1 mm, 1.5 mm, and 2 mm anchor distances.

The first group of prints with 0.15 mm support top width, reinforce height of 2 mm, lowest anchor distance of 1mm, and different anchor distances.

With higher support density on the bottom of the model, all prints succeeded. Again, there were some surface deformations.
The next group of prints was printed with a 0.25 mm support top width, reinforce height of 2 mm, lowest anchor distance of 1 mm, and different anchor distances.

This time, all models printed perfectly.
The final group of prints was printed with a 0.35 mm support top width, reinforce height of 2 mm, lowest anchor distance of 1 mm, and different anchor distances.

All models 3D printed successfully and without surface deformations. Again, supports with 0.35 m top widths were much harder to remove. Especially on the first model with a 1 mm anchor distance.
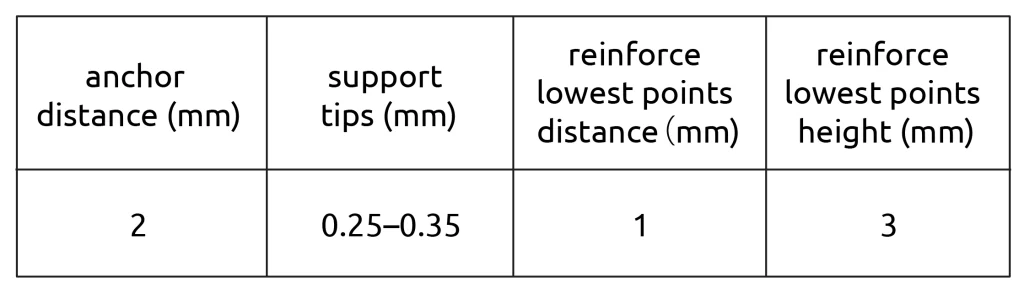
To sum up, the reinforce lowest points feature with 1 mm will greatly improve the success rate of model printing and prevent part deformation. Once we supported the bottom of the model with the 1 mm lowest anchor, we were able to support the rest of the model with 1.5 mm or 2 mm anchor distances. That uses less material compared to supporting everything with a 1 mm anchor distance. We were able to use thinner support tips of 0.15 mm which left fewer support marks and were easy to remove.
For the hemisphere model, the optimal support parameters are:

Support settings for large and heavy disc
Then we moved to print a bigger model. This time we chose to print a solid disk with a diameter of 10 cm, a thickness of 1 cm. With Voxeldance Tango slicer smart supports, it weighed around 100 g. We placed that disc on its side.
Based on the previous test results, we chose 2 mm as the anchor distance for the large disc. We also expanded the scope of the experiment by adding a 3 mm anchor distance to see if it can be successfully printed too.
We set the reinforce lowest points distance to 1 mm. Since the model is so big and heavy, we have increased the reinforce lowest points height to 3 mm.
And then, we tried different support tips (support top width): 0.15 mm, 0.25 mm, and 0.35 mm.
The first group of prints with 0.15 mm support top width, reinforce height of 3 mm, lowest anchor distance of 1mm, and anchor distances of 2 and 3.

Both prints failed. The printer only managed to print the edge of the disc.
The second group had the same settings as the previous ones, except for thicker support top widths of 0.25 mm.

This time, a model with an anchor distance of 2 mm succeeded. However, the support density of 3 mm was not sufficient to hold the disc, resulting in failure.
The second group had the same settings as the previous ones, except support top widths were increased to 0.35 mm.

Again, the first model with an anchor distance of 2 mm succeeded, while the one with 3 mm – failed.
Thus it is safe to say that the anchor distance of 2 mm is appropriate for printing this disc, while the density of the 3 mm anchor distance is insufficient.
If we look back at the support tips with a 2 mm anchor distance, we can see that the 0.15 mm tips were too thin. Meanwhile, support tips of 0.25 mm and 0.35 mm resulted in successful prints with good surface quality and easy support removal.

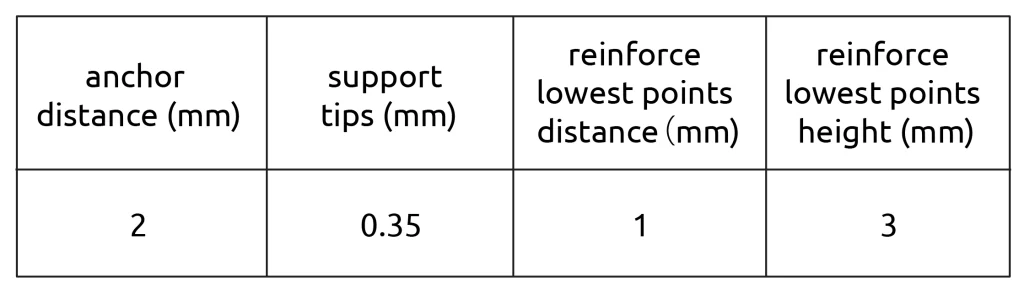
For the large and heavy disk model, the optimal support parameters are:
Supporting large-scale organic figurine
Finally, we used the results of our previous tests with a large figurine. We kept everything the same and tried support top widths of 0.25 mm and 0.35 mm.

The model with support tips of 0.25 mm did not print part of the wings, while the one with 0.35 mm produced a very good print with no defects.
For the large and heavy disk model, the optimal support parameters are:
Summary on Tango slicer smart supports
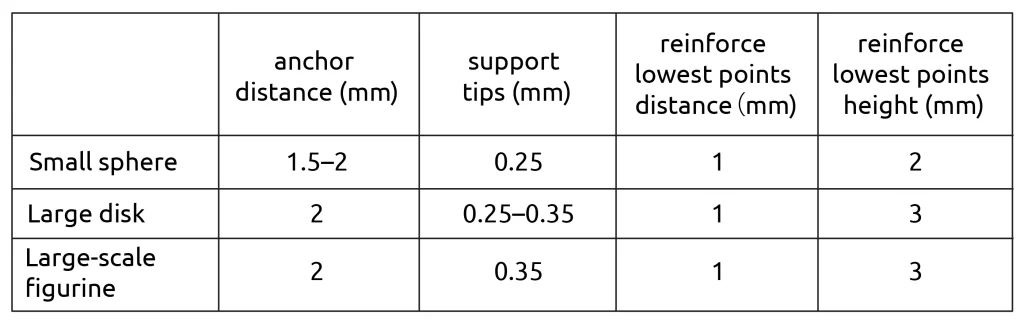
To sum up, these are the Voxeldance Tango slicer smart support settings we have found to be working well for AmeraLabs TGM-7 resin on the Elegoo Saturn 2 3D printer using 3.2 s exposure for 0.050 mm layers.
We hope that this article gave you an insight into the process of finding optimal supports for your prints. Of course, these can also be fine-tuned further to increase the success rate and make support removal easier.
We also did not cover the finding of exposure settings in this article. Exposure time will directly impact the details of your prints and the strength of supports.
Even though the topic of supports in resin 3D printing is so complicated, we are optimistic about the future. Automated supports of modern slicers like Voxeldance Tango moves towards simplifying this complicated process to only 4-5 different variables. We hope that in the future, more and more of these variables will be researched, tested, and pre-defined for the users.
Other articles from AmeraLabs
- The Complete Resin 3D Printing Settings Guide for Beginners
- 10 reasons why you get unexpected horizontal lines on your 3D prints
- Why is it so important to shake the resin bottle?
- 9 common mistakes when switching from FDM to SLA 3D printing
- 6 Key Principles of 3D Printing Supports that Work
- Why should you not use default 3D printing raft settings?